
Project Gregorian1
A bit of background
Every year for the past decade or so my wife and I have bought a fractal art calendar to hang on the wall between our desks. We both like fractals and thought the work of this particular artist was really excellent. The calendars were were well made, showed the days in a way we liked, and generally ticked most of the boxes for us for a wall calendar.
In October 2025 my wife discovered that the creator of the calendars had stopped making them, so we had to decide what to do for a wall calendar in 2026: should we try to find a different fractal calendar, or go for something else entirely?
As we were sat talking about this with our monitors in view, I pointed out that the form factor of the calendar was fairly close to a 24 inch screen in portrait orientation. We could scan the images from previous calendars, or we could use any of the nearly 70,000 photographs2 we've taken over the past couple of decades, and display them above a generated calendar. We need not even be constrained by the limitations of paper at that point!
The requirements
Eventually we settled on a few key things any dynamically generated calendar needed to do, with any features on top of these being nice to have:
- The week needed to start on Sunday.
- Instead of showing one month at a time, the calendar should show a 5 week rolling view: the previous week, the current week, and the next three weeks.3
- The display should show the month and year information, and handle the case where the rolling display spans multiple months or the start/end of years.
- The calendar should be able to fit the colour scheme we want for the room.
- The display should have an image at the top, and the calendar below it, as you would expect for a wall calendar.
- There should be some way to move the calendar display forward and backward to show past or future weeks.
You can see more details of the features the system provides in the readme file in the project repository.
How the devil to build this
Having opened my big mouth, I now had to work out how to make this work. It obviously had a bunch of extra things to decide on that the bare requirements didn't even really touch on, things like
- Desktop program, or web application?
- How to get events into the calendar? Import from an ical feed? Or multiple ical feeds? Or allow events to be defined in the system? All the above?
- How to get pictures in, how to choose which picture to show at any given day or time, and what dimensions to use for the pictures?
- How to actually display it on a screen?
- How to do the controls?
- Many, many other sentences ending in '?' that I will spare you!
The first constraint to help narrow down the implementation space was that it had to fit onto a 24 inch screen in portrait mode, so 1080x1920 was the target for the display. I didn't want to try to drive the screen off any of the computers on the desks, and I have several spare Raspberry Pi 3B+s lying around from old projects, so it made sense to have a Raspberry Pi connected to the screen and have it show the calendar.
This helped to add another constraint! My past experience with Raspberry Pis has made me very wary of running anything important on them because they seem to be harsh on microSD cards. I've had decent quality microSD cards go dead in less than a year when used in a Pi, so I didn't want to put the actual calendar software on the Raspberry Pi, just in case it shat itself and lost any data between backups. I decided the most straightforward approach would be to write the calendar system as a web application running off my server, and have the Raspberry Pi connect to the WiFi and start a web browser in kiosk mode showing the calendar page. That way the system would be part of the normal backups on the server, and nothing would be lost if the SD card went off to silicon heaven.4
Using a Raspberry Pi also opened up the option of using the GPIO pins to
provide a means of controlling the display. One of the standard
device tree overlays
available on the Raspberry Pi is the gpio-key overlay, and if you connect a
push-button switch between an appropriate GPIO pin and 0v, you can have the
gpio-key overlay emit an input event when that button is pressed (the overlay
also handles debouncing the
switch, which makes life even easier!) Multiple GPIO-connected buttons can be
added, allowing a range of input events to be triggered in response to
button presses.
To the code mines!
As previously noted, the "volunteering to make this thing" happened in October. What I didn't say is that it was the last week of October. Which meant I had two months to get it into a usable state for the start of the year. So I decided to fall back on building it in a language I know well (Perl5), in a framework I've used for years, cribbing a lot of supporting code from another one of my projects to get things going faster.
I'll skip the gory details of the implementation - if you are interested, you can find the code and instructions for installing it in the Project Gregorian repository6. A few pointers if you really want to explore the code for Eris knows what reason:
- The calendar page itself is generated by the WallCalendar::Calendar
class. The entrypoint in that file is the
page_displayfunction at the end, which calls_dispatch_uito generate the HTML content or_dispatch_apito handle API calls from the javascript. - Other classes in the views
directory generate other pages - the images manager, login form,
and settings page. The entrypoint in each is the
page_displayfunction, which then calls the UI or API dispatcher for that class. - Classes inside the modules directory are system and support code, with model code for the calendar data and image handling inside modules/WallCalendar/Database
Some things I will note about the implementation process, though:
- I decided early on that I wouldn't allow the creation or editing of events through the site, and I would rely on importing events from established calendar tools using ical feeds. Building an event management UI looked like being a complete pain in the arse, and it would have taken me a lot of time (I didn't have) to get even close to key feature parity with existing calendar tools. That said, the database schema is set up in a way that could allow for an in-system event management UI in the future if I ever lose my godsdamned mind.
- Building this thing had me get way more familiar with RFC 5545 and siblings than I ever thought I would be, and in the process I discovered some things I've never seen calendar tools do that the spec supports (particularly around repeat events). I was honestly impressed with how much thought had gone into it, even if section 3.3.10 will haunt my nightmares for a long time to come.
- Relatedly, I also discovered that different calendar tools interpret parts of the spec in subtly different ways, which was... unsurprising.
- This whole project takes an arguably terrible approach to dealing with time zones and DST7. In that it largely ignores them as much as possible. Essentially it treats events as happening in 'local time', and the only real shenanigans with time zones happen when establishing when "now" is. I think it will work in practice as long as you're not dealing with events defined in multiple time zones, but I'm not certain, and it makes my head hurt summat proper.
The hardware side
The hardware side of this project was much more straightforward - there are essentially three major components:
- The screen. Any 24 inch screen would work really, larger ones could work but the system assumes a 1080x1920 display so it might not look right without tweaks8. We got a fairly basic Philips 24E1N1100A for it.
- The Raspberry Pi. Pretty much any of them should do the job, although any before a 3B+ might struggle, and the 4 or later may need active cooling. In fact any system that has wired or wireless network support, can run a web browser (ideally Firefox-derived), and outputs its display over something the monitor supports should do the job, I just happened to have a RasPi 3B+ lying around.
- The control buttons. I'll describe this in more detail shortly, but this is essentially a very simple circuit on a piece of stripboard with wires going to a set of GPIO pins on the RasPi, housed in a 3D printed box.
As it turned out, the choice of screen was quite lucky: there is just enough space in the cable entry area at the back of the monitor to fit the RasPi, and the space is deep enough that the RasPi can sit inside the standard case and be stuck to the monitor to hold it in place.


The control buttons
As mentioned above, if you set up a push button switch between a GPIO pin on
the RasPi and the 0v line, you can use the gpio-key overlay to emit a
key event when the button is pressed. There are lots of ways to do fancy
things with this, but for this situation all it really needs is 7 push
switches wired up to GPIO pins:
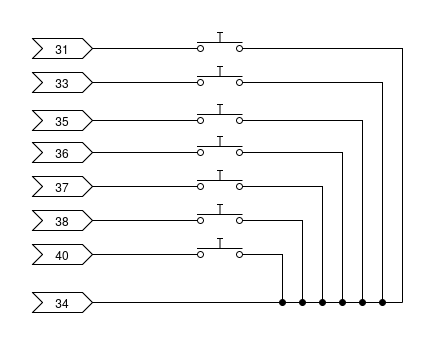
The stripboard implementation of the circuit is a bit messy - definitely not my cleanest work. I used a pair of old USB cables to connect to the RasPi, and I was not entirely consistent in the selection of colours for the cables for each switch, so a fair bit of double-checking connections with a multi-meter was needed. To help keep the wires in place, and to provide a bit of strain relief, I used some strong black thread wrapped over the wires and through the stripboard.


Once connected onto the GPIO pins for the RasPi, the config.txt with gpio-key overlay lines added was all that was needed to make the buttons work.
The button bar itself would look a bit ugly just hanging out there naked, so I designed an enclosure for it and asked a relative who has a 3D printer to print the box for me:


It fits around the stripboard circuit and holds it in place, and the printed buttons give a bit more area to press than the small push buttons alone.
Fitting the bar below the screen was a bit trickier - I needed some way to mount it, and the screen bezel is too thin at the bottom. Luckily I had a piece of acrylic left over from another project 9 that was almost the right size, minus a few cut-out pieces that I could work around, so by sandwiching the acrylic between the screen and the wall mounting plate, I could use double-sided tape to stick the button bar below the screen!
The rest
A few other things were needed to make the whole thing work:
- First the RasPi needs to be configured to boot into X11 rather than wayland (so unclutter will work)
- unclutter needs to be installed to hide the mouse pointer
- screen blanking and xscreensaver need to be turned off
- a firefox.desktop file has to be added to ~/.config/autostart/ on the RasPi to load the browser after the desktop has loaded.
With those in place, whenever the Pi is powered up it will boot to a desktop, start the browser, and load the calendar automagically.


Some closing thoughts
This was definitely an interesting project to take on, and so far it has been working out well: it's something we both look at many times a day, and the rolling nature of the display really helps prevent surprises at month starts.
I would be utterly lying if I tried to claim that there had been no problems with the system, but for something that I put together the majority of in a handful of weeks (with only parts of weekends and some evenings to work on it) I am really happy with how it has turned out. There are definitely some places in the code I could improve or clean up a bit, but really that's true of any project.
The worst part - and the part that has led to the most bugs, headscratching, and profuse swearing - has been the process of importing calendar events from ical feeds. It has definitely given me a very profound appreciation for the complexities of calendar handling and I would not be at all surprised if the importer is something I end up having to tweak or fix more than anything else in the code over the coming months.
- 1: Or the "Ridiculously Overengineered Wall Calendar" project. ↩
- 2: 67,871 as of this page - we're somehow up to 262GB of storage used, including video files! ↩
- 3: Why this is not a common thing for digital calendar systems I do not know. ↩
- 4: You know, where the calculators go. ↩
- 5: Yes, I still use Perl. Believe it or not, there are literally dozens of us still using it! ↩
- 6: The git history is truncated, in case you are wondering. I got the code to largely usable state, and then flattened the history. Nobody needs to be subjected to the state of the code before this. ↩
- 7: So much hate for DST. So much. ↩
- 8: Perhaps one improvement I should add is the ability to configure the expected screen size, to better handle resizing of images... ↩
- 9: Yes, I have a lot of bits and pieces from old projects. They might come in handy sometime! Like this! See, it happens! It's not a pointless collection of bits and pieces! ↩